|
Using the design specifications for the type of car I wanted the Green Rover to become, I looked at as many Land Rover modifications as possible to get ideas. I spent a lot of time trying to design a conversion that was rugged, met my needs and made best possible use of space. Here is a description of the modifications that I have made. Many of these modifications are described in detail elsewhere in this site.
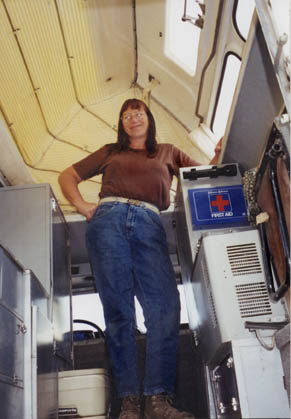
Camper interiorSpending rainy days in the back of the car convinced me that I wanted additional head room so that the car would seem roomier, I looked at a lot of pop up top designs and decided to go with a ready made Dormobile top. It opens up to provide over seven feet of head space and provides additional windows and a vent. The top comes with two fold out cot beds providing a sleeping solution that does not take up cargo space. I liked the Dormobile wardrobe for storage. You could pack a lot of stuff out of sight and keep the center isle open. The bottom folds up to make a jump seat as well. I decided to put one wardrobe on each side directly behind the driver's and passenger's seats. This provided me a lot of storage space and a surface for mounting padded head rests. Since I only obtained one wardrobe, I fabricated a second. Instead of a jump seat, I left an opening to fit a small toilet. 
I decided to go with a stock Dormobile cooker and sink cabinet. It is a compact cabinet that sits under the window and has two propane burners, a broiler and sink plus storage space underneath. I decided to place it in the standard Dormobile left rear location over the left rear tool box. With the tool box lid off, there is a lot of space for storing cooking supplies. I decided to place a single side facing jump seat at the right rear. This provides a second seat in the rear. Placed opposite the cooker, it makes cooking easier. I decided that a second sink would be very handy. This would provide a sink for wash water and one for rinse water making it easier and quicker to do dishes. I decided to design and construct a stand for the sink and place it next to the other sink. This stand provides additional storage space as well a space to mount the water pump and a water filter. The door opens up to become a small table. A water faucet was mounted between the two sinks so that it could fill both sinks. 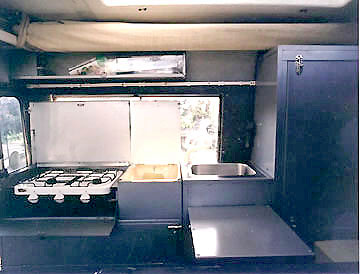
I have not been able to keep ice in a cooler for more than three or four days. The water from the melted ice gets into the food and generally makes a mess. I decided to install a chest style refrigerator. This meant I needed to design a stand for the refrigerator and add a deep cycle battery. The refrigerator stand provided space for a compartment that holds 8 quarts of oil. Enough for an oil change. I decided to place the deep cycle battery in the right rear tool box under the side facing jump seat. This puts the battery next to the refrigerator and keeps the weight as low as possible. The battery runs the refrigerator, two florescent lamps, the water pump, CB and radio. It also provides power to three 12V accessory sockets. I wanted to have opening windows along the both sides for light and ventilation, but I did not want windows behind the wardrobes. I opted to fabricate sides from two sets of sides. I cut the rear section off a set of 88 blank sides and the front off a set of station wagon sides. I riveted the two sides together to make a pair of 109 two door sides that have opening windows at the rear sides and no windows behind the wardrobes. 
I placed a large fire extinguisher where the back of the center seat would be. This provides easy access from front or rear and is large enough to be effective. There is a small first aid kit on the firewall in front of the sift lever and a larger second kit in the rear. I also placed a flashlight near each first aid kit for quick access. The inside body except for the pop up part of the top and floor is covered with sound deadening insulation. The walls have plywood and a gray short pile indoor outdoor carpeting. The metal parts of the roof are trimmed in gray upholstery to match the seats. Front interiorI built a center cubby box to replace the center seat. I wanted to make it as roomy as possible. The Green Rover has a factory utility box that fits under the center seat above the transfer case. I added an interior door handle to the front inside of the utility box to make it easily removable. The inside box was triple coated with sound deadening insulation. The cubby box was constructed out of plywood, covered with sound deadening insulation on the inside and dense foam on the outside. The overall height is 13 inches at the rear and 12 inches at the front. I determined that this was the best height to rest my arm and the front slant let my hand side forward to the sift knob. The finished dimensions are the same as the center seat bottom cushion allowing me to use the stock mounting brackets. This also provided space behind for a large fire extinguisher. I built a front ceiling rack to mount the radios. This is made of plywood. Basically its a bottom and front with the corner rounded, covered with dense foam and upholstery. It sits on the inside top railing. The rack holds a stereo with two speakers and a CB with weather channels and an exterior speaker. These are powered by the rear deep cycle battery. The instrumentation has been changed. The large dual gauge has been replaced with a Smiths tach from an MGB. A pair of Smiths fuel gauges from MGBs show the fuel level in the front two fuel tanks. A Smiths water temperature gauge and a Smiths oil pressure gauge provide information from the engine. A Lucas voltmeter replaces the 30 Amp ammeter to show the condition of the charging system. The oil pressure, generator and cold running lamps were retained. I replaced the broken stock speedometer with a series III speedometer. This adds a trip odometer, a bright light indicator and two additional warning lights. The dual wiper motors were replaced with a series III single wiper motor system. The new wiper system works a lot better and is safer in bad weather. I replaced the original windscreens with the heated windscreens that were optional on late series Land Rovers. The Amber warning light in the speedometer is lit when the windscreen heater elements are on. The green warning light is lit when the rear work lamp is on.
Petrol, water and propaneI wanted more petrol capacity that the original 12 gallon front tank, but I did not want to mount jerry cans outside the car where they could be hit or on the roof where they would raise the car's center of gravity. I added a second front fuel tank under the left front seat. A stock front side filler assembly with a modified hose was used. This added an additional 12 gallon capacity inside the car with the weight at the frame height. Next I added an 18 gallon rear petrol tank. This is the tank that comes stock on 109 station wagons. I used the filler assembly from a Land Rover high capacity pickup. This provided a total petrol capacity of 42 gallons, all inside the body at frame level. 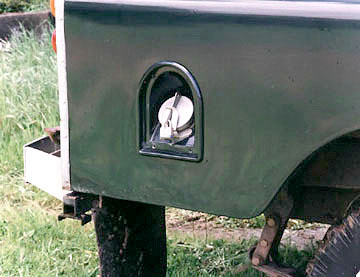
The 109 two door has a bench along each side of the rear. The space under the bench between the front fuel tank and the rear wheel arch is unused. There is an unused frame outrigger located on each side under this space. On the right side is a horizontal five gallon propane tank mounted on the outrigger. It has a regulator that provides low pressure gas for the cooker. There is also a valved 'T' fitting for filling the tank. The 'T' is also used to connect a reserve bottle if the built in tank empties in the field. I cut a rectangular hole in the side of the body to provide access to the propane tank. The access lid and hardware is a Land Rover rear toolbox lid. 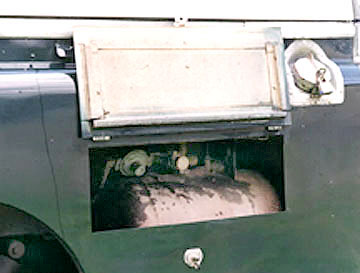
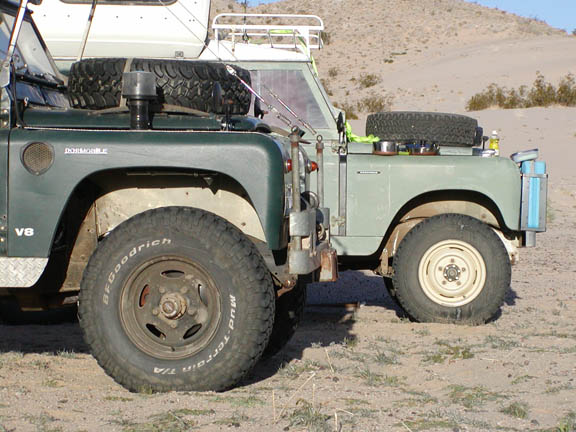
On the left side in this previously unused space is a fifteen gallon stainless steel water tank. I cut a rectangular hole into the top of the bench. The tank has a top flange that sits on top of the bench. Additionally, it rests on the outrigger below it. I used a recessed filler bracket from a front fuel tank. The metal filler tube was cut off just below the mounting flange and PVC tubing was placed inside the remaining metal filler tube to fill the water tank without contacting the metal filler. An additional 30 gallons of petrol, five gallons of propane and fifteen gallons of drinking water have been added into previously unused interior space at the frame level. I was very pleased that it did not raise the roll center or take up any usable space inside the car. ExteriorOther than the openings needed for the water, propane and additional fuel fillers the body remains basically stock. The bottom skirts have been reinforced by aluminum diamond plate. I do have a tendency to sand fallen logs and rocks with the offside diamond plate skirt. The lower body behind the rear wheel arch has been cut horizontal to provide additional ground clearance. Previously, both sides were bent from running aground on rocks while rock crawling. This additional ground clearance at the rear overhang makes it less likely to come off a rock and damage the rear body. I added wedge shaped sections of 'U' channel stock to each rear corner of the frame and brought out the frame to protect the rear corners of the car. This squared off the rear frame member creating outside rear corner jack points for a high lift jack. A high lift jack can now lift a rear corner and have the car remain stable. I consider this to be a very important safety modification. This modification also allowed me to mount rear military bumperetts. These have saved the rear of my Land Rover from certain damage twice so far. The rear bumperetts gave me an exterior location to mount my hi lift jack. Two sections of 'L' channel mounted inside a rear bumperette provides a base for the jack stand. I fabricated an upper mounting bracket out of galvanized steel framing hardware and bolted it to the rear galvanized body capping. It holds the jack securely in place and looks like it could have been stock. 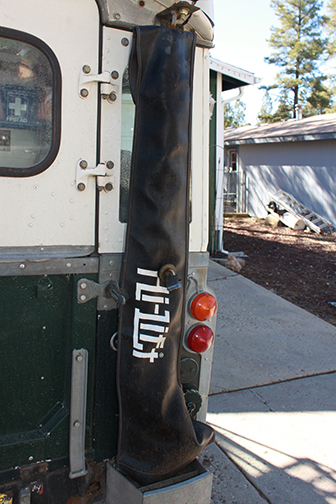
The front bumper received military pull rings and bumper over riders. The over riders provide additional front protection, and the pull rings provide front recovery points. I keep a short hardened chain with hooks in the car that can be used to connect a single recovery line to both rings. This distributes the stress to both sides of the frame. At the front of the car sits a Vancouver winch. This massive Canadian made winch holds 150 feet of 3/8 inch wire cable. 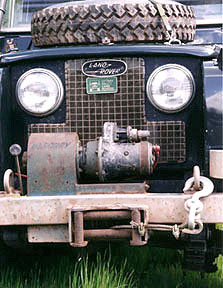
The grill has been covered with window screen material to keep insects from clogging the radiator. Diamond plate has been added to the tops of the front wings for additional strength and slip resistance. The front wings provide access to the roof rack when it's mounted. The head of a removable handle pick axe sits on the bonnet to the right of the spare tyre. I used stock pick axe head mounting brackets from a Land Rover 101 cab forward. The handle is strapped vertically inside one of the wardrobes. 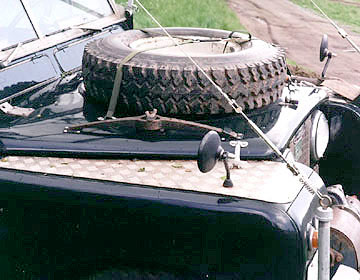
The top of the left wing supports a shovel. I used the Land Rover military shovel and shovel mounts. 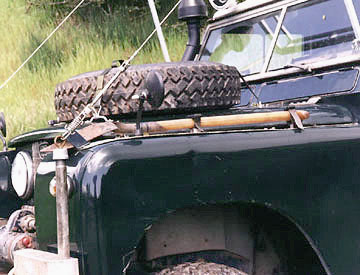
There is a Mantec snorkel mounted on the right side to provide cleaner air to the air cleaner. The stock civilian bonnet latch was replaced by Land Rover military side pull latches. I was concerned by the way the bonnet vibrated on wash board surfaces and wanted front latches that would pull each side down. The goal is to protect the bonnet from shake induced metal fatigue. I also added the military spare tyre hold down straps to keep the tyre from vibrating around the centre civilian tyre mount and causing bonnet metal fatigue on severe wash board surfaces. The bonnet is locked down by a single hood pin located in the center front. The pin was installed when I purchased the car so I left it there rather than deal with a hole in the bonnet front. When I was deciding how I wanted to convert the rear interior into a camper I gave a lot of consideration to the rear door. I had a tailgate and a lift gate for the top. Replacing them with a side opening door would provide easier entry. In the end I decided to stay with the tailgate because I use it as a work surface and as a seat. I converted the lift gate to a side opening door top using two Land Rover lower door hinges. 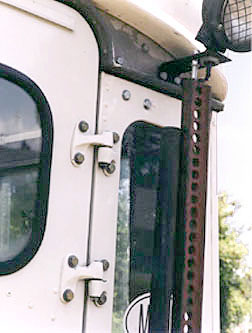
This makes entry more difficult that a rear door but keeps the work surface and provides an opening rear window when parked. I added a work light to the rear. To keep the hard steel light mount from fatiguing the aluminum body. I added aluminum plates to the front and back sides of the body providing the bracket with a triple thick body mounting surface. I also added a bolt to the bracket that sits on top of the jack. This bolt prevents the bracket from vibrating on severe wash board surfaces. I have designed a new roof rack that replaced the damaged Brown Church Dormobile roof rack I had on the car. The rack sits on my car just slightly taller than the plastic Dormobile roof vent. It serves to protect the rare Dormobile roof from damage. 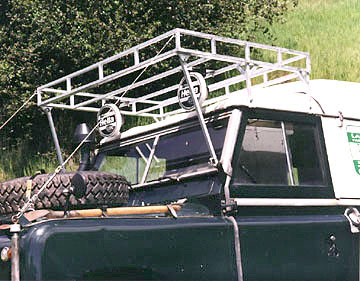
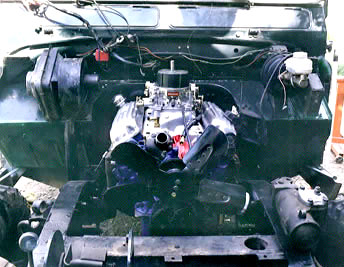
Like I said, the exterior is basically stock... Engine compartmentThe engine compartment contains a number of modifications from the great rebuild of 1999. The most noticeable is that the 2-1/4L engine has been replaced with a Ford 302 V8. This engine has transformed the vehicle performance and moved it into the same range as the North American spec V8 Defenders. A 105 AMP Delco alternator is mounted high on the right side providing plenty of power for all the lighting and accessories. The ignition is a Ford Duraspark II pointless system. Also seen in the engine compartment is the booster for the dual power brake system.
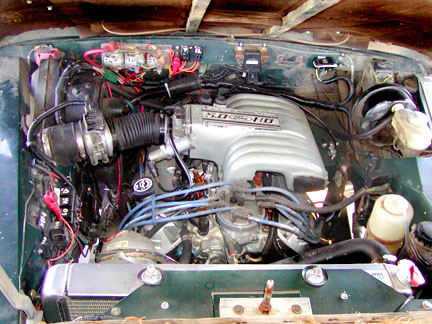
The weight of the 302 is almost the same as the Land Rover 2.25L engine, with the 500 CFM four barrel carb I was getting identical fuel consumption figure to those I got with the 2.25L petrol engine. The difference is that the 302 has more HP and torque at idle than the 2.25 has at peak. This allows me to focus on scenery as I drive and not on how best to attack the next rise in the road. I no longer watched the tach for the needle to drop to the shift point a little below max torque to down shift. The power steering made steering at very low speeds very easy and I lost an important part of my upper body exercise routine. I was quite pleased, but as time went on found myself wondering if I could get better fuel mileage than I got from the 2.25L engine. In 2007 I found the answer in EFI and converted the engine over to 1991 Mustang EFI. This requires completely rewiring the truck from the instrument panel forward in order to integrate the EFI wiring and a complete replumbing of the fuel system. The EFI fuel system has a fuel return to the tank line. Plumbing all three fuel tanks for fuel return would have been complicated and required a second switch over fuel valve. I decided to plumb the larger rear fuel tank to work with the EFI and and the two smaller front fuel tanks as transfer tanks. The Mustang 5.0 HO EFI system is a sequential EFI which means that fuel is added to each cylinder just as that cylinder's intake valve is opening. My engine has different cam timing. I couldn't afford to replace the cam at the time and decided to make due with the old timing. What this means is that the fuel arrives at the wrong time but it only resulted in slightly rougher idling that got smooth off idle. There was no power improvement but the engine ran smoother on rough surfaces and at steep angles because there was no float and float valve to be shaken up. Highway fuel mileage stayed the same but there was a dramatic improvement in around town mileage.
As part of the EFI upgrade I removed the restrictive Mantec snorkle and the air cleaner that sat on top of the carb. I replaced them with a Donaldson canaster air cleaner munted to the underside of the right wing top and a Donaldson prefilter. The tube between the prefilter is 3 inches in diameter. I kept it short to minimize both visual and air flow restrictions.
In early 2010 I found the money to complete the EFI conversion with a new cam that had the correct timing. Cylinder head technology has improved a lot since the late 1960's. I decided to update the cylinder heads for additional power using less fuel. I choose Airflow Research cylinder heads since they had the best power specs in the under 3000 RPM range. The cam is optimized for low RPM power and fuel efficiency. Since over 90% of my driving is at or under 2500 RPM I could care less about the power specs above 3000 RPM. So in 2010 my engine got new AFR cylinder heads, new cam, timing chain, timing chain tensioner, gears, lifters, push rods and rocker arms. I don't have good fuel economy numbers yet but I know I noticeably drive a lot farther between fill ups. I wild guess would be 20 MPG or slightly higher on the open highway. The engine idles smooth and feels peppier. Also in 2010 my T-18 gearbox got replaced by a hybrid NP-435 close ratio gearbox. Hybrid because it has a Ford gearbox case with Chevy close ratio gears inside. This gives me gears that better match where and the way I drive my truck During that swap, Timm Cooper rebuilt my tired transfercase, installed a new bearing kit in my rear Salisbury plus a number of other maintenance related things. Current Drive TrainAs of the end of march 2010 here is what The Green Rover's current drive train looks like: Engine is 1968 Ford 302 with 1991 Mustang EFI, AFR heads and COMP cam but otherwise basically stock, Gearbox is an NP-435 with close ratio gears (low range first is 50:1 at the axle). Series transfercase with Ashcroft high ratio kit provides stock low range ratios and higher high range ratios. This allows me to have 50:1 in low range first and to cruise at 65 MPH at 2550 RPM with 33 inch dia tyres. Rear prop shaft is a stock 6 cylinder 109 prop shaft. The rear end is a Salisbury with ARB locker and Maxidrive axles. The front prop shaft is a hybrid using a long slip joint, high angle U joints and Range Rover Classic tubing in between. The front axles assembly has a Trutrac automatic biasing diff, Maxidrive 4.75:1 ring and pinion (much stronger than stock), SeriesTrek 24 spline front axles and front disc brakes.
Pictures and description of the great rebuild of 1999 2010 gearbox swap, engine upgrade and maintenance Step by step generic engine conversion description Suspension and steeringThe rear axle housing was replaced with a heavy duty Salisbury assembly. The axle breathers were replaced with Defender style breathers to reduce axle housing internal pressure and pinion seal leakage. The front steering was updated to the stronger series IIA specification. The worn out steering box was replaced with a Saginaw power steering box originally out of a 1980 I.H. Scout. 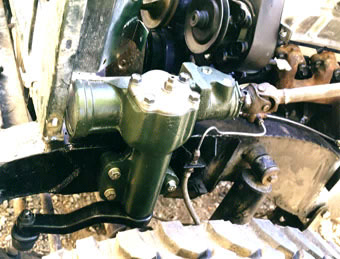
A steering stabilizer was added to increase stability on rough surfaces. A Quaife limited slip differential has been added to the front housing. An ARB air locker now sits inside the Rear Salisbury axle housing. One ton springs have been installed with the military style extended shackles. High density plastic strips have been placed between the leaves to allow the leaves to move against each other easily. This increases articulation and provides for a smoother ride. The stock 5 inch wide 16 inch rims were replaced with stock Land Rover Discovery steel rims. These are 7 inch wide 16 inch slotted rims. This allowed 265/75/16 B.F. Goodrich Mud Terrain tyres to be fitted. Step by step power steering conversion description Future modificationsI am looking for a very small rugged propane heater to keep the interior warm on freezing winter nights. I would like to replace the lower body skirts with strong steel box rock sliders to protect the front fuel tanks. I have a design that I think is superior to what is currently available. This should provide serious protection to the front fuel tanks during a side impact. The shock absorbers limit articulation at all four corners. I'm researching alternative front & rear shock mounts to enable longer shocks to be used. Currently on level ground I can pick up four additional inches of static articulation just by removing a front shock. I put these wishes together as the MKII specification. Somehow writing down a design specification seems to turn a "wouldn't it be nice" into a "plan of action". |
||
|
If you would like to discuss any of the contents, or just say hi, please feel free to .
© 1997, 2001, 2017 TeriAnn Wakeman. All rights reserved. |