|
2007 Front Axle Conversion
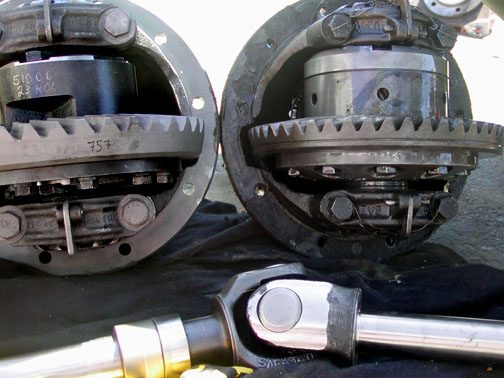
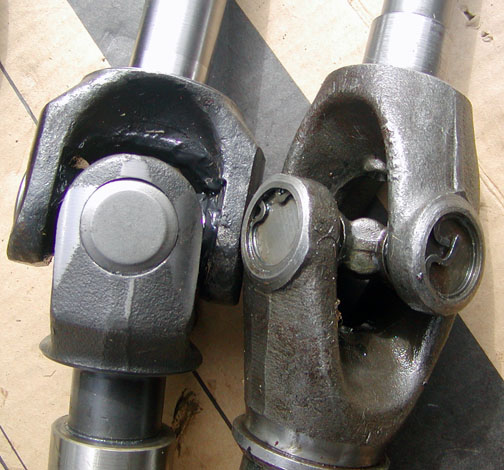
Looking at the picture, perhaps the most obvious thing is how massive the 4.75 Ring gear (left) is to the 4.7 (right). Even more so if you realize that the 4.7 ring gear has a spacer behind it (The ring gear area below what looks to be a horizontal groove is actually a separate spacer). The Quaife and TruTrac are both very strong automatic torque biasing differentials of similar design. The design uses 3 pairs of worm gears instead of spider gears. The Trutrac carrier is installed in a later metric differential housing out of a Range Rover classic. The Detroit carriers were designed to fit into these late housings and requite sleeving of the carrier bearings to fit into a Series housing. .My axle case had to have a little metal ground away at the diff opening and a pin pulled in 1997 when the Quaife was installed. If you have a die grinder it is an easy modification to the axle housing and is only needed by the early housings. My new differential assembly was built and set up by Great Basin Rovers.
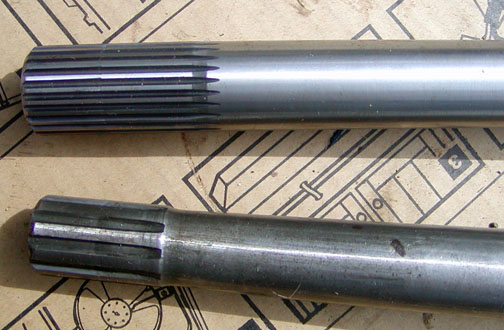
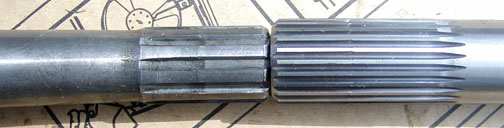
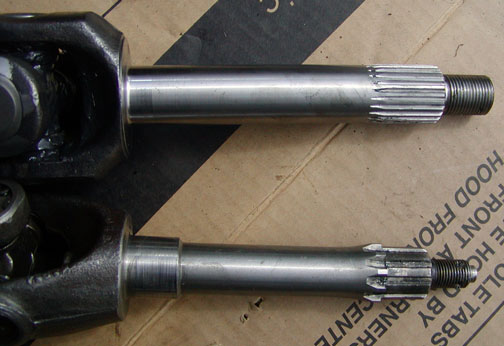
Land Rover 10 spline axle vs. Series trek 24 spline axle made by SeriesTrek
The swap was supposed to be a direct bolt in trade with no modifications needed. I did run into one problem though. The SeriesTrek axles would not go all the way into the housing. After some measuring the axle bearings were slightly smaller diameter than the bearing race pressed onto the 24 spline axle. New axle bearings (the one that fit at the inner end of the swivel ball) provided the clearance needed to get the axle race into the bearing. I suspect the problem was a combination of old bearings with a loose cage letting the bearings on top hang down a little farther and the SeriesTrek race having vertical shoulders. If the inner edge of the SeriesTrek bearing race was chamfered it might have lifted the bearing into palace and would have made installation easier with the new bearings. Either way, the old axle bearings were likely installed when my Land Rover was built and worn enough to warrant replacement anyway. Other than the time needed to locate the cause of the problem, to order parts and to disassemble the brakes and swivel assemblies to install new axle bearings when job went OK. I took the opportunity to replace my 10 spline selctro hubs with the stronger 24 spline Superwinch freewheeling hubs.
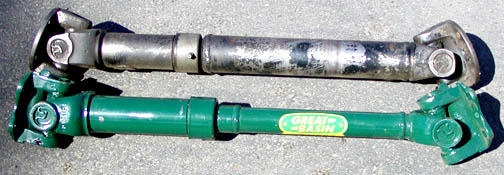
New front Prop shaft custom made by Great Basin Rovers.
I commissioned Great Basin Rovers to make a new front prop shaft for me. I had two problems to solve. One is that the shaft was contacting the under bulkhead cross member when both springs were extended. The other is that the yolk halves were in contact at full downward articulation. 10 years earlier I had my front prop shaft rebuilt using a longer than stock spicer slip joint. Land Rover uses GKN yokes and slip joints which are not readily available in the US. However Spicer makes replacement parts that are comparable. The Spicer replacements come in 3 lengths of slip joint, the shortest of which is closest to the stock Land Rover slip joint length. I choose the next longer slip joint to allow for greater than stock articulation. When I ordered the new front prop shaft I specified that I wanted the high angle yokes, long slip joint and smaller diameter tubing where the shaft passes over the under bulkhead cross member.
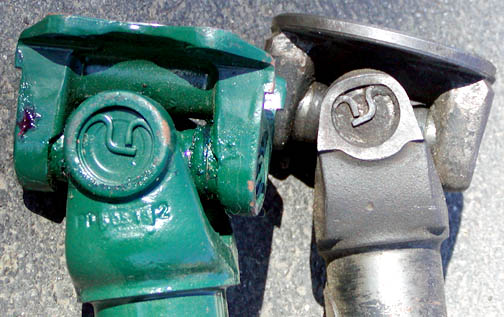
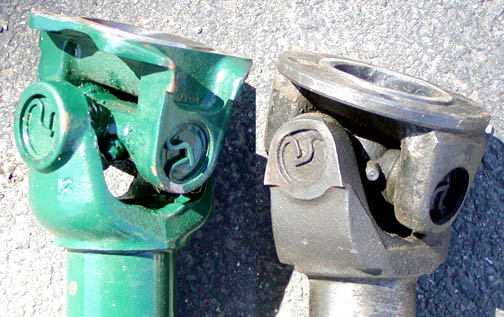
Here's a couple pictures comparing the stock style Land Rover (Spicer) yolk with the high angle yoke. This is not a good comparison as I took a grinder to the stock yoke several years back and removed metal from where they met. So the yoke can rotate at steeper than stock angles without coming into contact. But if you look closely you can see the increased space on the new yoke that allows it to handle even greater angles at full downward articulation. There was an unexpected bonus to the axle swap. The new yokes additional clearance allows me to use a socket on one end of the fixing bolts.
Addendum on my Great Basin Rovers prop shafts:Within 3 years of installing the new Great Basin propshafts both were twisted along the shaft and required replacement. I do not mean to imply that the shaft tubes are of inferior quality, just that the two I have experienced twisting along the shaft length. I had stock Rover prop shafts under my truck powered by my Ford 302 V8 for the previous 7 years without twisting a shaft. Early in 2010 as part of a gearbox swap, I returned to a stock Rover rear prop shaft and replaced the tube on the front shaft between the extended slip joint and rear high angle U joint with Range Over Classic front propshaft tubing.Graseable frame poly bushings from Great Basin RoversDon't ask me how new frame bushings became part of a front axle upgrade. All I can say is that when I got under there it was obvious that the Ironman poly bushings already on the truck died a very early death and desperately needed replacement and I just got some cheque in from ebaying some items. Poly bushings can not stand heat well. They become soft and disintegrate. The Ironman poly bushings I got came with a lube but that lube didn't last all that long before I started hearing the standard dry poly bushing suspension squeak. Washboard roads case nearly constant motion of the poly bushings and the friction from dry moving bushings builds up heat ... and they die. The theory behind greaseable poly bushings is that you can easily regrease them without any disassembly. So if you remember to lube them you don't get suspension squeaks and the friction stays low enough that the bushings don't come apart from excess heat. Neat huh!
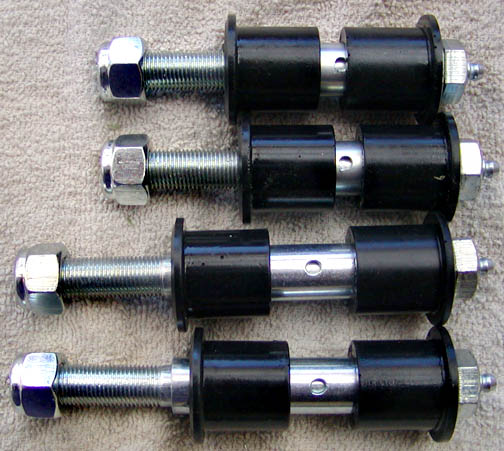
Here is a set of greasable frame bushings from Great Basin Rovers.
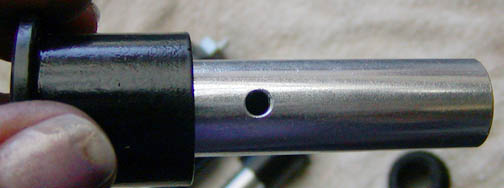
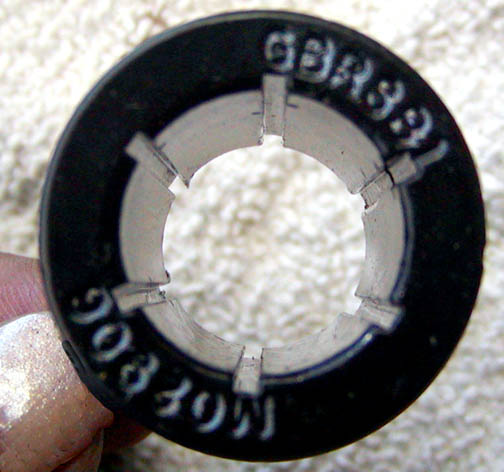
The grease travels though the hole in the bolt to the underside of this steel bushing, through the hole above and into the slots in the bushing below.
Bushing movement Written by Bill at Great Basin Rovers Actually the movement on a stock Land Rover (metalastic) bushing is the 3/16 inch of vulcanised rubber stretching. Metalastic bushings are known as bound bushings because the rubber is bound to both the inner and outer sleeves and the only movement is the rubber stretching. This is why when you convert to an unbound bushing (poly bushing), you will increase the suspension travel/articulation by 10% or so. You will also improve the ride quality with unbound bushings especially on rougher roads because a bound bushing starts to decelerate the suspension movement when you start to approach the elastic limit of the rubber. Numerous claims have been made for poly bushes that I don't particularly endorse. I have heard from many sources that poly bushes will outlast metalastic bushing by anywhere from 3 to 5 times longer. I personally think this is bullshit. On the other hand, one thing that decreases the life span of a poly bush is heat. The major benefit of greaseable poly bushes is that it cuts down on the friction increasing the bushing life span Hope this was enlightening.
|
||
|
If you would like to discuss any of the contents, or just say hi, please feel free to .
© 1997, 2001, 2017 TeriAnn Wakeman. All rights reserved. |