|
Land Rover Dormobile lifting roofroof, vent, top bunk and such |
Intro > Dormobile features > Lifting roof |
Cabinets | Seats | Refrigerator | Toilet | Badges | Exterior options |
|
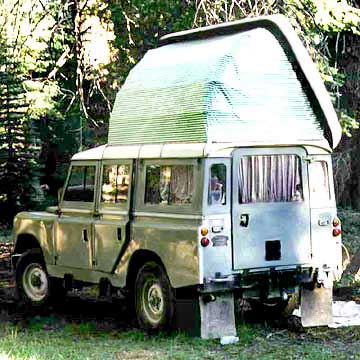
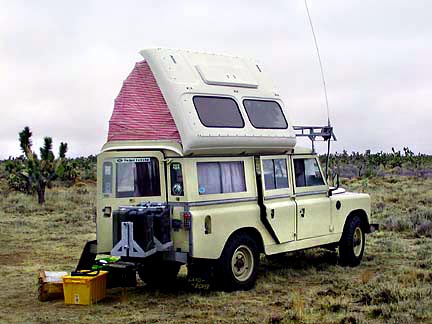
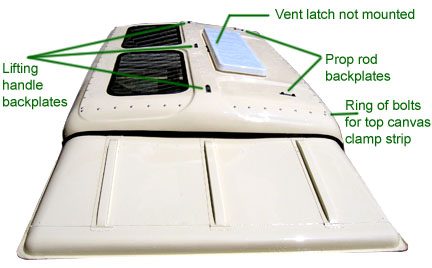
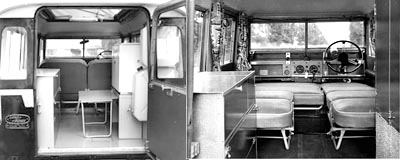
Lifting Roof
Lifting roof interior
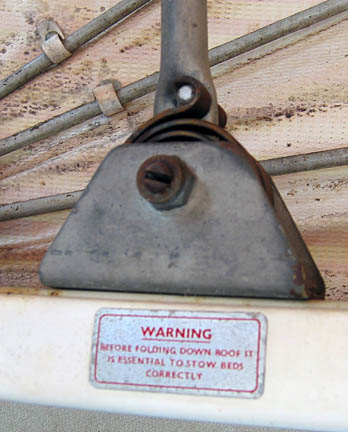
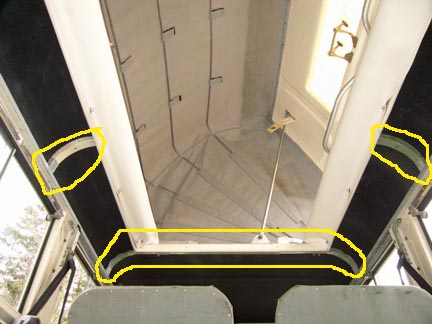
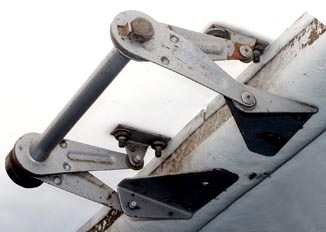
This picture of the underside of an erected top shows a lot. You can see the steel bows that hold the top plastic canvas in place. These are thin wall steel painted gray. They bend easily and easily rust through. Last time I looked, replacement bow sets were reproduced by Dormobile Ltd. Mine were badly rusted when I purchased my kit. I just took my old bows to a custom machine shop and asked them to reproduce them in Stainless steel. The ones I had built were stronger than the originals, do not rust and cost me way less than purchase and importing stock replacement bows. Along the length of each bow you will see plastic strips with snaps that holds each bow into its proper location against the plastic canvas. You can also see each of the upper bunks in their stowed location with the dust covers off. One of the two support struts can also be seen. The strut is composed of two tubes the upper of which telescopes into the lower one. There is a spring catch that locks the support into the full upright position. The roof vent is open. If you look carefully around the edge of the roof vent opening you can see a metal ring that holds bug netting to the roof. The is a corresponding one on the bottom flange of the vent cover that clamps the top of the netting to the cover. The vent latch is completely inside the net wall. The metal clamping rings are held in place by machine screws. Just below the vent is a metal tube handle that goes the length of the inside of the lifting top. You push against this handle and NOT the fiberglass top to lift the roof. You should always use this handle to support the roof whenever the support struts are not locked into their upright positions.
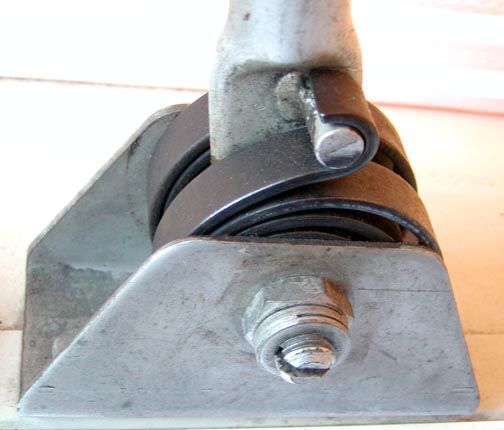
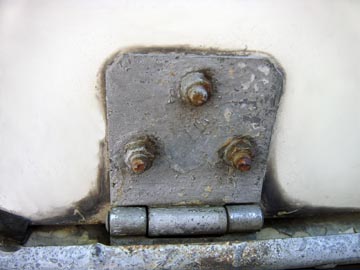
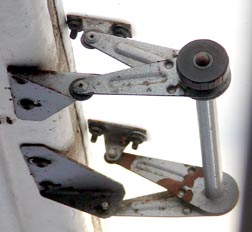
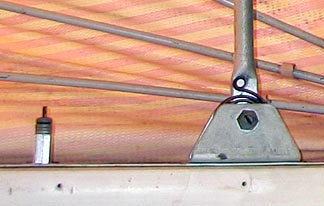
Above is a close up of the rear roof supporting arm base. There are a pair of coil springs in the base assembly that aid in lifting the roof and keeps the roof from free falling shut when the strut catches are released. The slotted bolt and nut allow the spring tension to be adjusted. These springs have been known to break. While I have never had to replace any, they do look a lot like the springs on a MGBGT rear hatch. Also in the picture above is the warning
decal that reads:
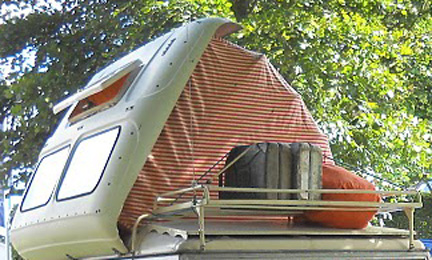
Lifting roof exterior:
Roof glass
Optional sun shield
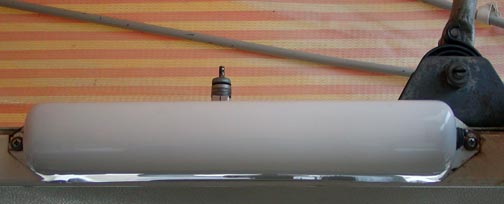
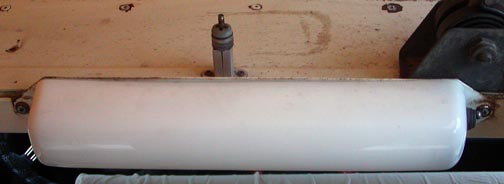
Roof vent
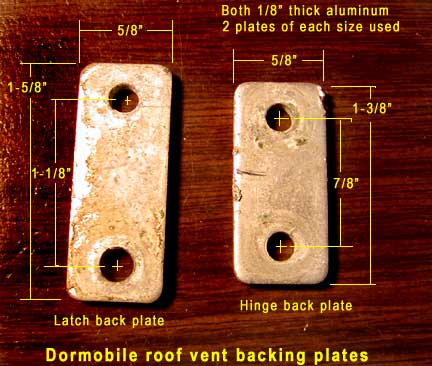
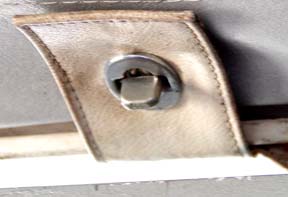
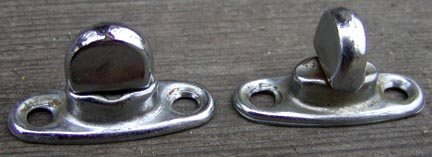
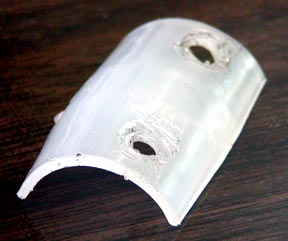
Backing plates for the roof vent hardware:
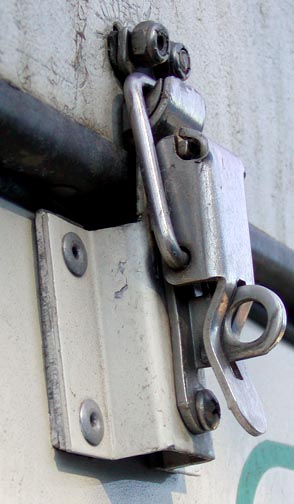
Door latches and hinges
External Draw Latch Martin Walter used a number of different external draw latches over the years so there is no one correct draw latch. Most were made from plated steel and have long since developed rust. Exact duplicates can be very hard if not impossible to come by. However very similar draw latches the correct size can be easily found though large hardware companies, such as McMaster-Carr.
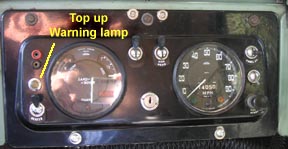
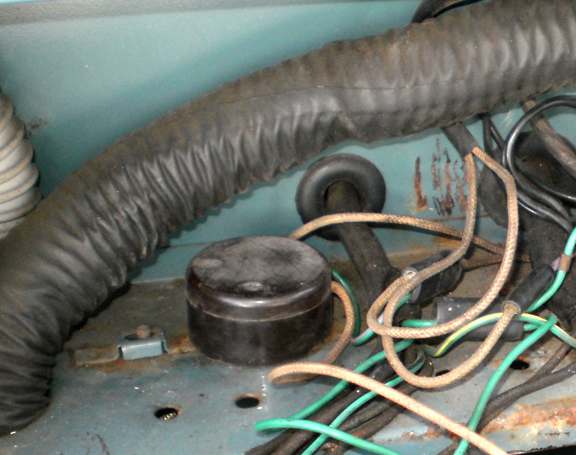
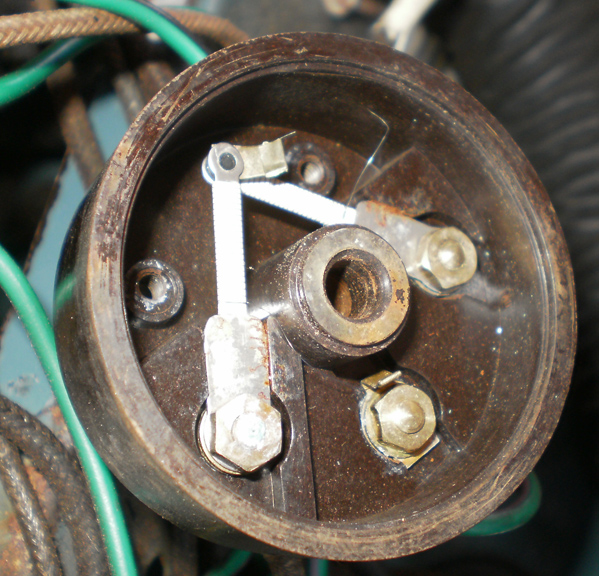
Top up Warning system
The unit is made by the Francis Searchlight Company, Bolton England
Top Glass:
Upper bunks:
Interior lighting
Rear rain gutter
Canopy installation instructions written by Dormobile Ltd. (PDF)
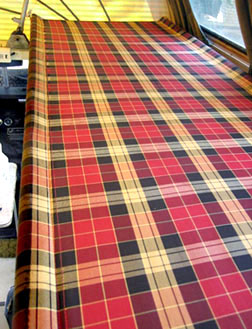
Some Notes from replacing my canopy When you receive the new parts for your roof project from Dormobile Ltd. open the packages immediately and verify that all the parts are there and that they are the correct parts. The project will go much smoother if you do not have to wait a few weeks for replacement parts to arrive while you are in the midst of the project. Remove and closely check over your roof's centre lift handle. They come plastic coated on the outside and are unfinished on the inside. Because of this they tend to rust from the inside out. They can be almost rusted through and look just fine from the outside. This bar is a critical part of the roof strength and rigidity. If you are replacing the centre lift handle you may find that some of the holes in the fiberglass roof do not quite match up with the holes in the new bar. Martin Walter drilled the holes to match the bar they used on your roof. Put in as many bolts as you can and drill any remaining offset holes. Always use a sealant when applying roof bolts to keep water from leaking through. The steel bolts holding the base of the lifting arms to the metal roof go through a steel captive nut. They sometimes have a rust buildup. If you are removing the lifting arms it is a good idea to use penetrating oil on these bolts a day or two before you intend to remove them. When the bolts are removed it is a good idea to run a tap through the nuts before reassembly. If the nut spins in its cage you will need to replace the captive nut assembly. The captive nut holder is a snap in part that can be purchased in hardware stores that have a good nut and bolt section. There is nothing special or custom about them. But you will need to remove interior paneling to gain access from the underside of the roof. The project will go a lot smoother if you first remove the top bunks. This is a good time to do any refurbishing that may be needed for the top bunks. New centre lift handles and lifting arms may or may not come with the clamp plates that fix to the top side of the fiberglass roof. If they do not verify that the mounting holes on the old plates and the new hardware match up and that the bolts fit both parts properly before you try to mount anything. When using a mixture of new and old parts it is always a good idea to verify fit before you find yourself up on a ladder with wet sealant on the part. It is best to make any part adjustment on the bench before you start to install anything. This project needs to be done with the fiberglass lifting roof, its hinges and lifting hardware in place and adjusted so that the roof closes properly. This is a two person project. Many steps require a person to be on each side of the canopy and roof. The steel rivets that Dormobile Ltd. provides require a heavier duty rivet gun than you find at your local hardware store. Look for something that has about twice the handle length. Before you start the project measure the interior distance between the top bow and the fiberglass roof. This should be done at the middle of the long side with the top fully erected. Then measure the distance between each bow. Any guide marks made by Dormobile Ltd will be off because they do not know the exact distance between your top bow and your roof. This will assure that your bows will be in the correct factory original position when you reinstall them. Start the project by removing the old canopy. Try not to damage the long side in the process. The nuts and bolts are all made of brass so when you are reinstalling the top go easy on the torque. As each of the metal clamping strips come off label where it goes. The holes in the roof and those in the metal strips were drilled together when the top was built so you want to use the same strips in the same location and minimize bending of the strips when you reassemble them. When you go to reassemble the top you will find it impossible to put both of the short side strips on the outside of the canopy. The factory had jigs that you do not. You will need to put the bottom clamping strip on the inside when clamping the the short length side of the canopy. Before putting the new canopy in place on the roof pre-punch the top long side holes in the canopy (do not prepunch the bottom row of holes). This will both assure the proper placement of the canopy and assure a better fit on the long side. The fiberglass roof is curved in both directions and assembly of the new canopy is done from the top down. The new canopy will be marked as to which side is the top side. Lay out the long side of the new canopy on a flat surface then lay the long side of the old canopy over it so that the corner seams line up and the top of the old canopy is about one inch (2.5 cm) lower than the top of the new canopy. The extra space on the top canopy provides a little fudge factor spacing. The stripes on both canopys need to be parallel to one another. Then punch the top row of holes using the holes on the old canopy to locate the new holes. You can use a paper punch or a leather hole punch to make the holes for the mounting screws (I used a leather punch because I had one on hand). Assemble the long side top of the canopy to the fiberglass roof using the pre-punched holes. You do not need to place any sealant between the canopy and the roof on the underside of the fiberglass roof as there is no way for water to get into the seam unless the vehicle is totally submerged. However it is a good idea to use sealant on all fiberglass roof fixings. You will want to attach the new canopy to the roof all the way around and mount the top bows in place before starting on the bottom. Once the top fixings for the long side are in place do the end sections then the top of the short side last. When attaching the end sections to the fiberglass roof have the vehicle on flat ground and eyeball that the end stripes are horizontal. I used an ice pick to start the canopy holes. When it came time to place the bows where they belong I removed a strip clamping bolt from the middle of the top canopy clamp strip then ran a string down from there to the bows, tyeing off each bow the proper distance from the fiberglass roof and each other. This places them in the proper location without attaching them to the canopy and possibly interfering with the drape of the new canopy. Many sheets of plastic stretch at higher temperatures. It is a good idea to attach the bottom of the canopy in cold weather. If you attach the bottom in warm weather the new canopy may be too tight to get the top fully erected. while on the trail. You do not want to stretch the canopy drum tight when you attach the bottom. If it is too tight it will be harder to fully erect the tip and the side fabric might inhibit the roof from fully closing. It should be tight enough to hold its shape but have enough easement to allow it to be completely erected. in cold weather. Just about every original Martin Walter installed canopy I have seen has tares at the bottom inside corners caused by the material at the seams over stretching when the canopy is closed. I tried to alleviate that stretching by curving the ends of the corner clamping strips inward to create a more rounded corner This leaves more seam material outside the clamps for more easement. It required drilling new holes at the end positions. Only time will tell if it helps. I clamped down the long side canvas bottom first, then the short side bottom with the strip inside the canopy where I could get at the screws. At this point lower the top then erect it again to assure that there is no binding caused by material stretching. This can be an issue when you clamp down the ends. Loosen the canvas at the bottom if needed. You are most apt to encounter resistance to closing the roof from over stretching the end canopy fabric. The safest way to attach the end bottom sections of the canopy is to punch the fabric for every second of third hole, add the fixings then close and open the canopy checking to make sure that the top closes easily without any binding near the bottom of its movement. Adjust the bottom if needed then do a full end assembly. Once the canvas is properly fitted it is time to anchor the bows. With them still in place with the string support attach the velcro wraps. Don't be in a hurry to trim off the excess bottom fabric. Give the canopy a couple weeks to settle in, opening and closing the top daily at the coldest part of the day just to assure that there is no binding from over stretching Once the extra fabric is cut off you can not let the fabric out to loosen the canopy.
Nick Baggerly wrote the following about removing and replacing the lifting roof Here are some lessons learned when removing and re-assembling the fiberglass Dormobile top. Removing the roof requires two people Before you begin, take some pictures of the raised Dormie top. These pics will come in real handy during re-assembly. Photograph both the inside and outside of the raised top. Pay attention to how the PVC fabric is folded around the aluminum securing rails. Take a picture to record the bow orientation, one for the bunk orientation, and another for the vent hardware. Another pic for the perimeter trim strips (they're the strips that the bunk cover turn buckles are fastened to). DISASSEMBLY Remove the bunks (for bolts each) and withdrawal from the vehicle. Use penetrating oil to prevent breaking the captive nut inserts in the metal roof. I broke several of these captive nuts once and can't find them at the hardware store. Any suggestions? Remove the bows (four bolts total) and withdrawal from the vehicle. Remove the vent fasteners and vent. Now you can put your head through the vent and stand up to unfasten all of the top screws. Now to remove the PVC candy-stripe tent fabric. Remove all the flat head screws, square captive nuts, and washers that fasten the PVC tent fabric around the perimeter of the fiberglass top. There are a lot of fasteners here so a cordless screwdriver on low torque setting will speed this up. This is brass hardware and you may snap some of the screws. Be careful to not rip the candy stripe fabric as you go. Remove the bolts that secure the two telescoping poles to the fiberglass top (four bolts) noting that the nuts are on the outside (on top of the roof) Remove the three hinges that secure the fiberglass top to the roof. It is necessary to remove only the 9 screws that connect the hinges to the fiberglass top. Withdrawal the fiberglass top from the vehicle. Remove the long lift bar (six bolts) that is used to raise the roof. Remove the four plastic perimeter trim strips, bunk covers and turn buckles using a Phillips screwdriver. Martin Walter didn't use brass hardware here because these strips are fastened into metal. If your top has never been removed, the rusted screws may strip and be difficult to remove. For these, use an air grinder (or dremmel cutting disc if you have one) to square off the screw head. This allows a needle-nose vise grip to get a hold and turn them. Replace with stainless screws if you like. ASSEMBLY PREP:
You'll save some money if you remove the roof yourself and bring it in. Also, tell the body shop to place a dowel (or small screw) through each hole in the fiberglass top prior to gel coating. This will prevent the holes from being filled in. Assembly will be difficult if the holes are covered by the gelcoat as drilling will be required. Thoroughly clean the PVC candy-strip tent fabric. While the PVC tent is removed, consider sewing in a tent-like fly complete with zippers into the rear of the tent. This serves as a vent. The previous owners of Hercules II, the Canadian Dormobile made this modification and I think it's PRO!
If necessary, straighten the three hinges that secure the fiberglass top. Mine were bent a little If the plastic trim strips look bad or scuffed, lightly sand with 400 grit paper and paint them. I used Krylon red which matched quite nicely. These strips were originally red or white. The underside lift bar is coated with a piece of coloured shrink tubing. These were originally gray or red. Similar shrink tubing is available in many colours at your local well-stocked electronics store. I used a plasticoat dip that came out a bit rough. Inspect the bows for rust. If yours are heavily rusted you can have them fabricated as TeriAnn did using stainless steel tubing. Prep and re-paint if there's no rust present. Remove the bunk fabric from bunks. The bunk fabric is secured in each corner by a plate and two screws. Under each plate is a small rectangular rubber piece that prevents the plate from tearing the bunk fabric. Prep and re-paint the bunk frames. If your bunks are torn they may be easily patched. [include picture] Inspect bunk covers. If they are damaged, an upholstery shop can probably reproduce them in any material you want for $50 to $100. The original covers are a high grade cloth-backed vinyl. Now is also a good time to paint the top of the vehicle...or the entire vehicle for that matter. REASSEMBLY: Turn the fiberglass top upside-down (preferably on a couple tall horse-type stands) and attach the PVC tent fabric along the inside perimeter of the fiberglass top using old hardware and the four aluminum strips. It is much easier if you attach the PVC tent to the fiberglass top first. This step requires time and patience. Since you're inserting each screw through three layers, an electrical test probe or similar sharp tool is useful for lining up the holes. Next, offer up the fiberglass top to the vehicle. Get some help so you don't mess up your nice looking new top. Line up the hinges with their respective holes and insert the hinge screws. I recommend putting the nuts on the outside to prevent the screw ends from digging into your aluminum roof. Drape the PVC fabric in place around the roof and connect the telescoping poles to the fiberglass roof. With the roof raised half way (use a robogrip or correct size stick to keep the roof in position) secure the bottom portion of the PVC fabric along the perimeter of the fiberglass top using the old hardware and the four aluminum strips. Once again, patience and a buddy will help here. Install the bows (four bolts total) and snap into place. Fasten the four plastic perimeter trim strips, bunk covers, and turn buckles. Fasten the underside lift bar. Install the vent with fasteners. Use JC Whitney part number XXX for an easily installed vent seal. Slide the bunk fabric onto the bunk poles and install the bunks (for bolts each) by fastening them to the roof. Secure the corners by stretching the bunk fabric (you may need some help here) and secure each corner with the small aluminum plate and two screws. Prior to tightening these plates, insert the small rubber piece to prevent the plate from digging into the bunk fabric. Cut a piece of a bike inner tube if you are missing these small pieces. The weather strips for the oval windows use a Rover part. Part number LR 304235 ($8.33 each) for the weather strip. Each strip is held in place by a rubber lock strip (also called a filler strip), part number LR 304236 ($5.85 each). I installed the weather strips myself and it took four hours because I didn't know what I was doing. One year later, after the top was gel coated I decided to give an auto glass shop the agony. Using their special tools, they did both windows in less than five minutes. No leaks. Now would be a good time to drill a second set of holes in the telescoping poles a few inches below the original set. This allows the spring loaded ball bearing a setting that does not require full extension of the roof and is useful during the winter months when the PVC tent fabric is brittle. Finally, raise the top and give the PVC fabric a good coating of silicon spray. I like the stuff used on Zodiac inflatable boats since they too are made from PVC It is available at any boating supply.
More Land Rover Dormobile Features: Cabinets | Seats |
Refrigerator | Toilet | Badges | External
options | Kitchen |
Other |
Return to page top |
Return to Dormobile Introduction |
Return Home |
Copyright 1996, 2004 by John Hess, 2005 by TeriAnn Wakeman and John Hess All rights reserved
|