|
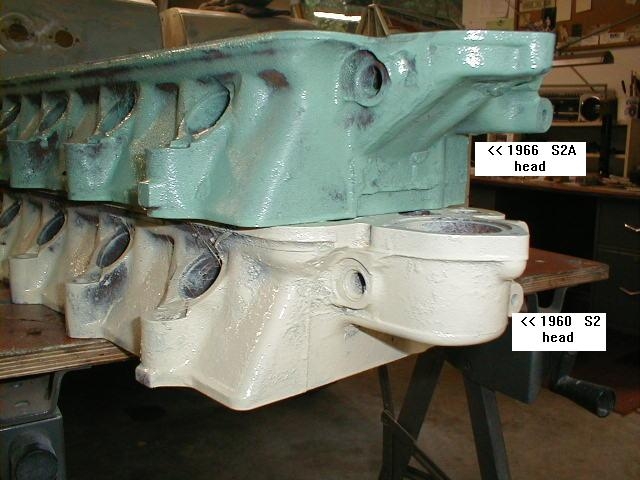
QUESTION - How can I tell if my 2-1/4L petrol engine has 7:1 or 8:1 compression? If I have a 7:1 head can I mill it to make an 8:1 head? ANSWER - Look at the center head bolt between the carburetor and the valve cover. The surface of the head under that bolt may look like the other head bolt mounting surfaces or it may be a raised flat surface about 2.5 cm (1 inch) wide that goes between the valve cover and the edge of the head. If the mounting surface under this head bolt looks like the surface under the other head bolts, you have an earlyish 7:1 head. If you have the raised rectangular surface look carefully to see if there is a number stamped on that surface. If there is no number or a 7 stamped there then you have a late 7:1 head. If there is an 8 stamped there (Mine looked like two zeros that were stamped to make an 8) then you have an 8:1 head. Only heads with the raised flat surface that have an 8 stamped on it are factory 8:1 heads. The early heads are all 7:1 and do not have as much metal between the water passages and the bottom of the cylinder head. You should not mill the early 7:1 head more than required for 8:1 compression. The later head castings are thicker between the bottom head surface and the water jacket. This makes the head less prone to cracking and provides enough metal to mill the head to 9:1. To raise the compression ratio accurately you really need to cc the combustion chambers. Rover was not real good about overall cylinder head height accuracy. A 7:1 head that has not been shaved is nominally 3.690 inches thick from the bottom surface to the valve cover mating surface. An unshaved 8:1 head is 3.590 inches thick. A 7:1 head can be milled to provide 8:1 compression by milling off 100 thousandths from the head surface. Before milling a head check to see how much may have been removed in the past and subtract that from the 100 thousandths needed to increase a head by a full point over stock. A 7:1 head can not reliably be milled to 9:1. According to Pat Young, if an 8:1 head has not been cut before, 0.020 in. is close to raising the compression from 8:1 to 9:1. Milling the head changes the rocker arm geometry. The push rods that came with a 7:1 head are 7.300 inches long. The push rods that came with 8:1 heads are 7.175 inches long. Last time I looked, 7:1 push rods were no longer available new. When a head is milled from 7:1 compression to 8:1 you should use the 8:1 push rods to correct the rocker arm geometry. If you mill a 8:1 head to 9:1 you can make due with 8:1 push rods since you are not milling as much off. There is very little clearance between the underside of the lower thermostat housing and the water pump housing. After resurfacing, ALWAYS check to see that the block's water pump housing is not interfering with the head's lower thermostat housing by laying the head on the block without the head gasket in place. You should be able to freely slide a sheet of paper between the lower thermostat housing and the water pump housing when there is no head gasket in place. If the surfaces touch, grind metal off both surfaces. Usually about a 1/6th of an inch or so total metal removal will do the trick. About 50% of the 7:1 heads shaved down to 8:1 compression have interference issues so be sure to check for interference. Notes on replacing the cylinder head. Run a straight edge over the block head mating surface to check for flatness of the block. There may be some raised edges where the bolts fit into the block. File them smooth before applying the head. Studs & bolts stretch over time and the application of torque. If you think they are original you might consider replacing all the head fixings with new ones. It never hurts to run a tap down threaded holes and if you are reusing nuts & bolts to run taps & dies on them as well. A composite gasket is more reliable at sealing than a shim gasket. So it is always a good choice. Follow the tightening order in the manual. Personally I like to tighten the head down in three stages. The first to about 20 lbs to get things settled, then about 35 lb ft and finally 65 lb ft. Then I go over it again at full torque. NOTE that the latest heads have metric threads & studs. If you are installing a unknown head into your engine and the bolts do not seem to want to go in easily check to see if they are metric or SAE. Do not force the wrong thread bolt into the threaded holes. Do not re tap the holes with different pitch stock dia taps. There will not be enough thread left to hold the bolts into the head and you will ruin the head. If you find that you have a newer metric head and you have SAE bolts and studs there is a head metric bolt kit available from Rover to let you properly mount the head. Also note that latest heads do not have a hole for mounting the cold running sender unit. Head casting numbers are not visible on a fully assembled engine. But if you have an un mounted head that you want to identify, here are the casting numbers.
Note: I do not know when Rover stopped using a cold running lamp Likely the sender mount would have been removed from the head at that time.
|
||||||||||||||||||
|
If you would like to discuss any of the contents, or just say hi, please feel free to .
© 1997, 2001, 2017TeriAnn Wakeman. All rights reserved. |